Category Archive : Electrical

IMG_256

10 best treadmill workouts you will love

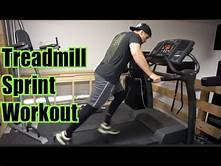
In order to prevent the injuries in future, its important to warm-up before going for the actual exercise. Stretching and walking at 2-3 MPH might be the required warm-up. Once the warm-up is done, let us have a look upon the list of workouts that you can perform on the treadmill.

  • Treadmill Hill Workout

IMG_256

These workouts are good for those who love running over hills and also for those who want to experience the same staying away from the actual site and injuries. This exercise focuses on boosting up the speed, stamina and the duration.

The user must cool down the workout by setting the speed level to 4 MPH and the incline level to 1% in the last 5 minutes.

  • Treadmill Hike Workout

IMG_256

The focus of this exercise is on the backside of the user. It follows a pattern where the incline increases with the time and so does the speed that fits the skills, offering enough safety and ease during the exercise.

For this, a user must start with a 5 minute warm-up where the speed is set at 3 MPH and the incline at 2%. For the rest of the minutes, the speed limit must be from 3.5 to 4 MPH and the incline level between 4%-12%. In this, the user is suggested to keep the same rhythm as the beginning.

  • Sidewinder Workout

IMG_256

This workout focuses on improving the strength, duration, heart rate and stability. For this, a 5 minute warm-up with the increasing speed from 2.4-3.5 MPH is a good idea. A 2 minute sideways walking must be done where 1 minute is given to the walking by facing towards the right and the rest is given to the walking by facing towards the left. Now, forward walking comes into the play with decreasing speed from 4.5-3.5 MPH per minute respectively. This pattern must be repeated till the next 6 minutes and the last 5 minutes must be dedicated to cool down and decreasing the speed from 3 to 2 MPH.

  • Pressed-For-Time Workout

IMG_256

This workout aims to work over the upper body of the user. To perform this exercise, the user must hold something in his/her hand with body weighing machines 2 to 5 pounds. This exercise must start with a 5 minute warm-up maintaining the speed from 2.5-3.5 MPH. Then a 5 minute walking followed by doing 10 reps of overhead press, front raises, upright rows and lateral raises each. Then the dumbbells must be kept away and a simple walking must continue for 4 minutes, allowing the upper body to recover. Repeat the second and third steps two more times after changing the incline to 3%. The last 5 minutes are for cooling down with the speed at 3 MPH and the incline at 1%.

  • Sprint Interval Workout

IMG_256

This exercise must be started by giving 10 minutes of warming up and increase in speed from 3-5 MPH. You must continue with a sprint in which your heart rate is 85-90% maximum, increasing the speed from 5-9 MPH.

Then, continue with 2 minutes of walking where you may find your heart rate to be around 120 to 130 BPM followed by the speed range of 3-4 MPH.

Continue for 20 to 30 minutes of alternating between sprint running and slow walking where the ratio of sprinting to walking must be 1:2. End this exercise by cooling down in last 5 minutes where the speed must be 2.5-3 MPH.

  • Gauntlet Workout

IMG_256

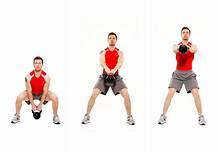
Beginners might find this exercise difficult, so its good if it is performed by more experienced users. This exercise starts with a 5-10 minutes warm-up through walking or jogging where the speed range is 3.5-5 MPH.

It continues with 1 minute of running with the speed of 5.5-7 MPH. Then 30seconds are given to kettlebell swings and 30 seconds to the push ups (both are off the treadmill) followed by 1 minute of plank (off the treadmill) and coming back again to the running on the reebok treadmill reviews with speed range 4-5.5 MPH. This procedure must be repeated at least 5 times for better results and the last 5 minutes must be dedicated to the cooling down with speed 2.5-3 MPH.

  • Never-a-Flate-Moment Workout

IMG_256

It is a highly efficient workout for burning calories. It starts with a 3 minutes warm-up with speed 3-3.5 MPH. It follows 4 minutes of running with speed 4.5-5 MPH and the decline 7%-4%. Then a 4 minute of speed walk with speed 3-3.5 MPH and incline 10%-6% respectively.

7 minutes running intervals and 11 minutes endurance incline 4MPH with 10%-15% incline are the next steps of this exercise. The last 3 minutes are dedicated for cooling down with the gradual decrease in speed and incline from 3.5-2 MPH and 3%-1%.

  • Side Shuffles

IMG_256

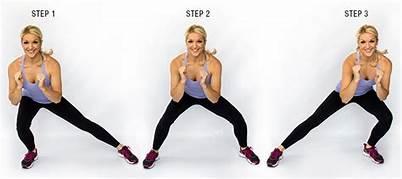
This exercise focuses on improving the thigh thighs’ muscles. This exercise is performed at a speed limit between 3-3.5 MPH to ensure the safety of the user.The side shuffles are done by turning right on the treadmill and flexing the knees, staying low in the legs, keeping the eyes up, body tall and not letting the feet cross each other. After 2 minutes, switch sides and shuffle.
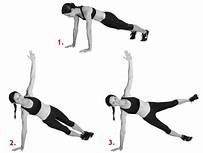
  • Walking Plank

IMG_256

This is for those who find the regular plank difficult. With the walking plank, the legs should be positioned off of the treadmill, but in straight line away from it, keeping the hands on the running belt. Set the speed at 2 MPH and do this for at least 5 minutes.

  • Crab Walk

IMG_256

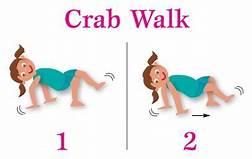
It has difficulty in performing it but is really fun. Set the speed to 1-2 MPH, stay in crab position, with the hands facing away from treadmill on the side of treadmill base, feet flat on the floor, hips elevated and the back facing the ground. Place the hands on the treadmill belt and start walking the hands in the forward direction.…

Korg-Metronome-4.png

List of Top 6 Metronomes of 2020

A metronome is a device that helps the artist to keep steady time while practicing music. It is generally used to keep a steady tempo of the song and avoid it to sound too rushed or too slow. It beeps or clicks to indicate the rate and helps the musician to play along with the tempo.

Metronomes indicate tempo at the rate of Beats per Minute or BPM. 60 BPM is one beat per second which is quite slow while 240 BPM or 4 beats per minute is considered fast.

Here is a list of the top 6 metronomes to help to choose the one according to your requirements:

Boss BD-90 Talking Dr. Beat Metronome:

DB.jpg

The range of beats indication of this metronome is 30-250 BPM. The constant tick-tock could get very stressful after a while so it comes with a very special feature of the human voice assistance. It has a microphone plug so that you could plug in your headphones and practice your music without bothering neighbors.

It has memory storage of 50 metronomes and 10 reference tone slots. It is quite multifunctional as it can be plugged in to many electronic instruments.

Merits:

  • Three different click sounds for differentiation
  • Human voice count feature
  • Multifunctional
  • Drum machine beats available

Demerits:

  • Needs a 9 V power supply
  • The stand of the metronome is not much durable

Wittner 836 Taktell Piccolo:

wittner.jpg

If you are old school and are looking for something classic, then your search might end here. It does not require any battery or other digital stuff. All you need to do is to wind it up to the key you are practicing and that’s it! Let the arm swing back and forth to indicate the rate. The metronome does not come with a tone of the downbeat so it must be handled by a well-experienced music artist who does not need a sound indication for downbeat.

Merits:

  • Classic metronome
  • No need of batteries
  • Attractive by looks
  • Small and easy to carry

Demerits:

  • Hard to differentiate between downbeats as it has no indication for them
  • Not suitable for beginners

Seiko SQ50-V Quartz Metronome:

4116dQHxtEL.jpg

If you don’t want to spend too much on another music accessory and want something simple and efficient which just fulfils its purpose, this Seiko SQ50-V Quartz is the ideal choice for you. This metronome consists of a large LED light that blinks to indicate the rate of tempo. It has two different click sounds for both upbeat and downbeat which makes it suitable for beginners. It also has a microphone slot which that will allow you to plug in your earphones.

Merits:

  • Affordable price
  • Two click sounds for better accessibility.
  • Compact in nature
  • Basic metronome ideal for occasional use

Demerits:

  • Microphone slot only support mono, i.e., sound will come out of only 1 earphone.
  • Not for someone who uses a metronome on a frequent basis.

Korg TM60BK Metronome:

The Korg series is one of the most popular metronomes. It is designed to be used as a metronome as well as a tuner. The updated version TM60BK is much better than the previous variants. A significant change can be observed in the battery life of the new model. A stand and new battery compartment is also added to the enhanced version.


Korg-Metronome-4.png

Its large backlit display for better visibility adds up to its various features. The metronome can indicate tempo range from 30 to 252 BPM. The memory backup of this Korg Metronome is also very good.

Merits:

  • A large backlit display
  • Serves the purpose of both metronome and tuner
  • Excellent battery life
  • Auto-power off function
  • Convenient memory backup

Demerits:

  • The tuner mode might not be easy to understand for beginners.

Matrix Tuner (MR600):

If you are looking for a metronome with a dial, this one is for you. Matrix Turner MR600 comes with a wheel-style dial. You just have to rotate the dial to the desired tempo and that’s it! With LED indicators, two kinds of sound and microphone plug-in slot, it becomes more accessible for beginners.

Merits:

  • Battery operated
  • Easy to transport
  • Comes with a A440 reference pitch

81sbZ9cJISL._SL500_.jpg

Demerits:

  • No additional features other than the basic metronome feature of indicating tempo.
  • The count range of MR600 is 40-216 BPM which is lower than other metronomes on the list.

Wittner Tuner 813M:

71h9YUyKboL._SL500_.jpg

If you are looking for a classy Metronome, then look no further. Wittner tuner 813M is made up of walnut colored wood which makes it durable and classy. The product is genuine and well-tested during manufacturing. Hence, the chances of it being faulty are meager. This metronome, though traditional in appearance does not weigh more than a pound.

Merits:

  • Classy appearance
  • Light-weight
  • Durable

Demerits:

  • It does not support digital features because if it being a mechanical metronome.
  • Not as accurate as electrical metronome
  • Contains a lot of mechanical parts which increases the chance of breakage.

Conclusion:

Looking at these items, you have to consider which the best metronome is for you. We recognize that customer has different needs, which ensures that options across the board vary. So, compare the items and choose your best instrument accordingly.…

C:\Users\Dell\Desktop\download.jpg

Electric Vs Manual Can Openers

When storing food got tough, then emerged the need for cans. Many people deal with cans in their way but your teeth are not can openers neither are your fingers.

Opening cans by your teeth or fingers can hurt you and cut you deeply. Can openers are finger savers and teeth saver to a certain extent. Today the use of can openers is worldwide and it makes popping a can or bottles a lot more easily.

Types

Broadly, there are two types of can openers found in the market, Manual can openers and electric can openers.

Manual can openers are the openers that are found in most of the houses. It is a tool that pops the lids off. Electric can openers are new and still haven’t received a lot of knowledge from many people.

C:\Users\Dell\Desktop\download.jpg C:\Users\Dell\Desktop\download.jpg

Difference

Here are some differences between Manual Can Openers and Electric Can Openers to help you choose the one that is ideal for you:

  1. Application: It is understood that when it comes to the applicability, electric can openers are going to win the race almost every time. A very obvious reason, because you don’t have to put in any effort, it is all done by the machine. Manual can openers require efforts by the person; they don’t work on their own.
  2. Technical: Manual can openers are easier to use, provided you have the required strength for the particular can. Electric can openers may be of great help, but there are buttons that you have to press. It might seem a little complicated in the beginning but with continuous use, it’ll become handy.
  3. Type of can: Electric cans cannot open heavy cans or cans with uneven shapes. They’re fit for the regular cans. Manual can openers go all the way up here since these are put to use by self it requires they can be turned and twisted in accordance with the shape of the cans.
  4. Durability: Manual can openers are more durable than electric can openers and there is no doubt about it. Electric can openers are like machines, these are bound to perish someday or the other. Manual can openers are like a tool, which might get rusted over time, but are not perishable.
  5. Constancy: Electric can openers cannot be trusted with all the cans and their different sizes. Electric can openers include mechanical components inside making them very delicate. On the other hand, manual can openers can handle a higher number of uses with very fewer chances of breaking.
  6. Power: Electric can openers need to be charged else they will remain dead. Manual can opens need not be charged since it’s a tool, not a machine. In case you are out for a picnic or any other activity, manual openers may lose out.
  7. Convenience: Electric can openers are very convenient to use and need no effort at all. These openers make a grip on the can and remove the lid for you. There is nothing that one has to do, other than pressing a few buttons. Manual can openers don’t share the same advantages.
  8. Caution: One can toss, wash, scrub, play with a manual can opener, but not the same in case of electric can openers. These can openers need a lot of care; its elements are sensitive and can be damaged easily.
  9. Price: The electric can openers cost more than the manual can openers. Its technical components make it more expensive. All services are charged for thereby, the relaxation it gives to the human body that is saving us from putting efforts, is taxed for.

Facts about can openers

  1. Cans developed when the storage of food became difficult, like in the mid-1700s and became popular by the 1800s. A little odd because of the heavy metal, mainly iron that was used to make it. Overtime its material, shape, and size improved.
  2. Can openers did not develop immediately after the development of cans. It developed after 48 years! Before that other objects were used in place of can openers.
  3. Previously designed can openers were very dangerous to use, later with the advancement of technology it was sorted by an advanced design., making it safe to use.
  4. Later in time, can openers replaced the sharp objects that were used to open the cans. Objects like the hammer, gouge or nails were put aside when can openers clogged the market.
  5. As mentioned above, can openers are tools, primarily used to pop cans, usually in a situation like the food industry and households.
  6. ‘Can openers’ are also popularly known as ‘tin openers’, and are usually made of metal where the holder might be plastic or stainless metal, but the cutter is metal.
  7. The cutter is shaped like a knife and is very sharp. The pointed part is attached strongly to a plastic or metal holder.
  8. Today, the use of can opener has become less because many cans come with pullable lids that don’t require any special tool. Like those found in pineapple, cherry or coke cans.

Conclusion

After going through the purposes mentioned above, one can choose their type of can openers. Where it may seem that manual can opener have a lot more advantages at cheaper rates, without it also depends on the level of comfort that one needs. That would make the difference and choice clearer. Other determinants like price, usability, etc. are of importance as well.…